# 数据结构
# 数组
数组是一种线性数据结构,用于在连续的内存空间中存储相同类型数据元素的集合。
# 数组的核心特性
固定大小
数组在创建时,其大小(即能容纳的元素数量)通常就被确定了。虽然在某些高级语言中(如 Java 的 ArrayList)有“动态数组”可以自动扩容,但其底层实现依然是先创建一个固定大小的数组,在容量不足时创建一个更大的新数组并进行数据迁移。连续内存空间
数组中的所有元素在物理内存中是挨个连续存放的。这是数组能够实现“随机访问”的基石。相同数据类型
数组中的所有元素必须是同一种数据类型(如全部是整数、全部是浮点数等)。这确保了每个元素占用的内存大小是相同的,方便计算地址。通过索引访问
每个元素都有一个从 0 或 1 开始的数字索引。通过这个索引,我们可以直接访问到对应的元素。
# 数组的关键操作与时间复杂度
| 操作 | 描述 | 时间复杂度 | 解释 |
|---|---|---|---|
| 访问 | 通过索引 i 获取元素 | O(1) | 因为内存是连续的,知道起始地址和每个元素的大小,可以通过公式 地址(i) = 起始地址 + i * 元素大小 直接计算出第 i 个元素的地址,一步到位。 |
| 查找 | 查找特定值的元素 | O(n) | 在最坏情况下,你需要遍历整个数组(例如,你要找的元素在最后一个或者根本不存在)。 |
| 插入 | 在指定位置插入新元素 | O(n) | 在位置i插入,需要将i之后的所有元素都向后移动一位,为新车腾出位置。如果在末尾插入,则为 O(1)。 |
| 删除 | 删除指定位置的元素 | O(n) | 删除位置i的元素后,需要将i之后的所有元素都向前移动一位,以填补空缺。如果在末尾删除,则为 O(1)。 |
# 数组中插入/删除元素
- 插入元素 这里我们讨论如何在数组的任意位置插入元素,实现思路是提供一个数组长度+1的新数组,将当前数组插入位置前的数据复制到新数组,然后在新数组中插入指定元素,接着将原数组剩余的数据复制到新数组。
数组中插入一个新元素
package com.kieoo.interview;

import java.util.Arrays;

public class ArrayInsertion {
    /**
     * 数组的指定下标中插入一个新元素
     * 时间复杂度O(n) 需要一次循环遍历
     *
     * @param original
     * @param index
     * @param value
     * @return
     */
    public static int[] insertAtIndex(int[] original, int index, int value) {
        // 参数检查
        if (index < 0 || index > original.length) {
            throw new IndexOutOfBoundsException("索引越界: " + index);
        }

        // 创建新数组(长度+1)
        int[] newArray = new int[original.length + 1];

        // 复制插入点前的元素
        for (int i = 0; i < index; i++) {
            newArray[i] = original[i];
        }

        // 插入新元素
        newArray[index] = value;

        // 复制插入点后的元素
        for (int i = index; i < original.length; i++) {
            newArray[i + 1] = original[i];
        }

        return newArray;
    }

    public static void main(String[] args) {
        int[] original = {1, 2, 3, 4, 5};
        int[] result = insertAtIndex(original, 2, 99);

        System.out.println("原数组: " + Arrays.toString(original));
        System.out.println("插入后: " + Arrays.toString(result));
        // 输出: 原数组: [1, 2, 3, 4, 5]
        // 输出: 插入后: [1, 2, 99, 3, 4, 5]
    }
}
- 删除元素 在数组中删除元素,我们只需要将原数组指定位置的数据删除,删除后将后续元素逐个往前移动即可。
# 数组中查找元素
在数组中,如果我们不知道具体要查找的元素的下标的话,只能通过foreach循环遍历去查找元素,这个操作的时间复杂度是O(n)。
# 链表
链表是一种线性数据结构,但与数组不同,它不像数组那样在内存中占据一块连续的空间。相反,链表中的元素(称为节点)可以分散在内存的各个角落,每个节点通过指针(或引用)来连接下一个节点,从而形成一个链式的结构。
# 链表的组成
链表由两部分组成,分别是数据域以及指针域。
- 数据域:用于存储实际的数据值。
- 指针域:用于存储指向下一个节点内存地址的引用。
创建一个链表类
package com.kieoo.interview;

public class ListNode {
    int val;        // 数据域
    ListNode next;  // 指向下一个节点的指针

    // 构造函数
    ListNode(int val) {
        this.val = val;
        this.next = null;
    }
}
# 链表的核心特性
- 非连续存储与指针链接 这是链表最根本、最核心的特性,其他特性都源于此。
内容:链表的节点在内存中不是顺序、连续存放的,而是分散在内存的各个角落。
机制:每个节点除了存储数据,还存储一个或多个指针,这些指针记录了下一个(或上一个)节点的内存地址,从而将这些分散的节点串联起来。
类比:就像一份藏宝图,每一处宝藏都告诉你下一处宝藏的位置,而不是所有宝藏都埋在同一个连续的地方。
直接衍生出的影响:
优点:打破了连续内存的限制,可以更灵活地利用内存碎片。
缺点:无法通过首地址和偏移量进行随机访问。
- 动态大小 内容:链表的大小不是在编译时或创建时就固定死的,而是在程序运行时动态地增长或缩小。
机制:需要添加新数据时,只需向系统申请一块新节点的内存,并将其链接到链表中;删除节点时,只需将其从链中“摘除”并释放内存。
对比:与静态数组的固定大小形成鲜明对比。动态数组(如C++的std::vector,Python的list) 虽然也能扩容,但通常需要申请一块更大的连续内存并复制数据,成本较高。
直接衍生出的影响:
优点:非常灵活,没有容量限制(除非内存耗尽),不需要预先指定大小,避免了内存浪费或溢出的问题。
- 高效的插入与删除 这是链表在操作性能上最显著的优势。
内容:在已知某个节点的位置后,在该节点附近进行插入或删除操作,时间复杂度是 O(1)。
机制:操作仅涉及修改少量指针的指向,无需移动任何其他节点。
插入:新节点.next = 当前节点.next; 当前节点.next = 新节点;
删除:前驱节点.next = 待删节点.next; (然后释放待删节点)
对比:在数组中进行同样操作,平均需要移动一半的元素,时间复杂度为 O(n)。
直接衍生出的影响:
优点:在需要频繁进行局部增删的场景下(如实现队列、撤销功能),性能极高。
- 低效的随机访问 这是链表为上述优点所付出的主要代价。
内容:要访问链表中的第 i 个元素,不能直接通过索引定位,必须从头节点开始,沿着指针链逐个遍历,直到找到目标节点。
机制:由于内存非连续,CPU无法通过简单的基地址+偏移量的公式计算出目标地址。
时间复杂度:访问、按索引查找、按值查找的平均和最坏情况时间复杂度都是 O(n)。
直接衍生出的影响:
缺点:不适合需要大量按位置随机读取的场景(如 arr[999])。
- 缓存不友好 这是一个在现代计算机体系结构下非常重要的性能特性。
内容:由于节点内存地址不连续,遍历链表时,对CPU缓存(Cache)的利用率很低。
机制:CPU缓存倾向于加载连续的内存块。当遍历链表时,访问下一个节点很可能需要从缓慢的主存中重新加载,而不是从高速缓存中直接命中,这被称为 缓存未命中。
对比:数组的连续内存布局则完美契合缓存的工作方式,遍历数组时效率极高。
直接衍生出的影响:
缺点:即使只是单纯地遍历整个链表,其实际速度也往往远慢于遍历一个大小相同的数组。
# 链表的关键操作与时间复杂度
操作 描述 时间复杂度 备注 访问 访问第 i 个元素 O(n) 必须从头节点开始逐个遍历,无法像数组那样通过索引直接定位。 查找 查找特定值的节点 O(n) 需要遍历整个链表。 插入 在给定节点后插入 O(1) 这是链表的巨大优势。只需改变相关节点的指针,无需移动其他元素。 删除 删除给定节点 O(1) 同样是巨大优势。在已知节点位置的情况下,只需改变其前驱节点的指针。如果是双向链表,删除自身更简单。 头插 在链表头部插入 O(1) 非常高效。 尾插 在链表尾部插入 O(1) 如果链表维护了尾指针 tail,否则需要 O(n) 时间先找到尾部。
# 链表的使用
# 遍历链表
我们可以通过while循环遍历链表:
    // 遍历链表
    public static void printLinkedList(ListNode head) {
        ListNode current = head;
        while (current != null) {
            System.out.print(current.val + " -> ");
            current = current.next;
        }
        System.out.println("null");
    }
# 链表头部插入数据
通过创建一个新节点,并将新节点的next节点设置为当前链表的head节点并返回,我们可以在链表头部插入数据:
// 头部插入元素
    public static ListNode insertAtHead(ListNode head, int val) {
        ListNode newNode = new ListNode(val);
        newNode.next = head;
        return newNode; // 新节点成为新的头节点
    }
# 链表尾部插入数据
通过遍历链表,获取最后一个节点,并设置最后一个节点的next节点,我们可以在链表尾部插入数据:
    // 尾部插入元素
    public static ListNode insertAtTail(ListNode head, int val) {
        ListNode newNode = new ListNode(val);
        if (head == null) {
            return newNode;
        }
        ListNode current = head;
        while (current.next != null) {
            current = current.next;
        }
        current.next = newNode;
        return head;
    }
# 指定位置插入数据
通过遍历,我们可以在任意位置断开链表,在断开位置插入新数据。
    /**
     * 实现思路
     * 1. 判断index,index为0的话就是头插
     * 2. index不为0,通过for循环遍历链表,获取到index位置的值及下一个位置的值
     * 2.1 创建待插入节点newNode,将待插入节点的下一个节点设置为index+1的位置的值
     * 2.2 将index节点的下一个节点设置的新插入节点newNode
     */
    public static ListNode insertAtIndex(ListNode head, int index, int val) {
        if (index < 0) {
            System.out.println("Invalid index");
            return head;
        }
        ListNode newNode = new ListNode(val);
        if (index == 0) {
            newNode.next = head;
            return newNode;
        }
        ListNode current = head;
        for (int i = 0; i < index - 1 && current != null; i++) {
            current = current.next;
        }
        if (current == null) {
            System.out.println("Index out of bounds");
            return head;
        }
        newNode.next = current.next;
        current.next = newNode;
        return head;
    }
# 删除链表头部数据
删除链表头部数据可以简单理解成插入头部数据的反向操作。
    // 删除头节点
    public static ListNode deleteAtHead(ListNode head) {
        if (head == null) {
            return null;
        }
        return head.next;
    }
# 删除链表尾部数据
删除链表尾部数据可以简单理解成插入尾部数据的反向操作。
    // 删除尾节点
    public static ListNode deleteAtTail(ListNode head) {
        if (head == null || head.next == null) {
            return null;
        }
        ListNode current = head;
        while (current.next.next != null) {
            current = current.next;
        }
        current.next = null;
        return head;
    }
# 删除链表任意节点
删除链表任意节点操作同样可以理解成插入链表任意节点的反向操作。
// 删除任意节点
    public static ListNode deleteAtIndex(ListNode head, int index) {
        if (index < 0 || head == null) {
            return head;
        }
        if (index == 0) {
            return head.next;
        }
        ListNode current = head;
        for (int i = 0; i < index - 1 && current != null; i++) {
            current = current.next;
        }
        if (current == null || current.next == null) {
            System.out.println("Index out of bounds");
            return head;
        }
        current.next = current.next.next;
        return head;
    }
# Java提供的链表类LinkedList
# LinkedList如何使用
Java中提供的链表类是LinkedList,我们可以通过声明List接口并实现为LinkedList的方式来使用LinkedList。
package com.kieoo.interview;

import java.util.*;

public class LinkedListTest {
    public static void main(String[] args) {
        List<Integer> list = new LinkedList<>();
        // 链表集合中插入元素,使用的是尾插法
        list.add(1);
        // 判断链表集合中是否包含指定元素
        System.out.println(list.contains(1));
        // 删除链表的第0个元素
        list.remove(0);
    }
}
# LinkedList中链表节点如何定义
LinkedList使用Node类类定义链接节点:
    private static class Node<E> {
        E item;
        Node<E> next;
        Node<E> prev;

        Node(Node<E> prev, E element, Node<E> next) {
            this.item = element;
            this.next = next;
            this.prev = prev;
        }
    }
# LinkedList中插入操作如何实现
- 在List接口中,我们会调用boolean add(E e);方法插入元素,LinkedList中该方法的实现如下:
    public boolean add(E e) {
        linkLast(e);
        return true;
    }
- add方法又会转调linkLast方法插入元素,看方法名也可以很容易猜出这里使用的是尾插法:
    void linkLast(E e) {
        final Node<E> l = last;
        final Node<E> newNode = new Node<>(l, e, null);
        last = newNode;
        if (l == null)
            first = newNode;
        else
            l.next = newNode;
        size++;
        modCount++;
    }
# LinkedList中删除操作如何实现
- 在List接口中,我们会调用E remove(int index);方法删除指定index下的元素,LinkedList中该方法的实现如下:
public boolean remove(Object o) {
        if (o == null) {
            for (Node<E> x = first; x != null; x = x.next) {
                if (x.item == null) {
                    unlink(x);
                    return true;
                }
            }
        } else {
            for (Node<E> x = first; x != null; x = x.next) {
                if (o.equals(x.item)) {
                    unlink(x);
                    return true;
                }
            }
        }
        return false;
    }
# 二叉树
# 二叉树的节点组成
二叉树的TreeNode节点的实现如下:
package com.kieoo.interview;

public class TreeNode {
    int val;          // 节点值
    TreeNode left;    // 左子节点
    TreeNode right;   // 右子节点

    // 构造函数
    public TreeNode(int val) {
        this.val = val;
        this.left = null;
        this.right = null;
    }

    public TreeNode(int val, TreeNode left, TreeNode right) {
        this.val = val;
        this.left = left;
        this.right = right;
    }
}
# 普通二叉树实现
普通二叉树的实现如下:
package com.kieoo.interview;

import java.util.LinkedList;
import java.util.Queue;

// 二叉树类
public class BinaryTree {

    private TreeNode root;  // 根节点

    // 构造函数
    public BinaryTree() {
        this.root = null;
    }

    // 1. 插入节点(简单的层次插入,不保证二叉搜索树性质)
    /**
     * 普通二叉树的实现只保持树的结构,而不对树中数据域的大小做任何约束
     * 如插入树的数据是3,8,5,7,1,6,9
     * 那么构建出来的树如下所示:
     *           3
     *          / \
     *         8   5
     *        /\   /\
     *       7  1 6  9
     * 可以看到构建出来的树没有任何的大小含义,如果我们要找到数字6,就只能一直遍历,最终找到6,这种方式添加和查找的时间复杂度都是O(n)
     */
    public void insert(int val) {
        TreeNode newNode = new TreeNode(val);

        if (root == null) {
            root = newNode;
            return;
        }

        // 使用队列进行层次遍历,找到第一个可以插入的位置
        Queue<TreeNode> queue = new LinkedList<>();
        queue.offer(root);

        while (!queue.isEmpty()) {
            TreeNode current = queue.poll();

            // 先尝试插入左子树
            if (current.left == null) {
                current.left = newNode;
                return;
            } else {
                queue.offer(current.left);
            }

            // 再尝试插入右子树
            if (current.right == null) {
                current.right = newNode;
                return;
            } else {
                queue.offer(current.right);
            }
        }
    }

    // 2. 查找节点
    public TreeNode find(int val) {
        return findRecursive(root, val);
    }

    /**
     * 递归查找二叉树中的节点
     * 这里这个递归实际上是前序遍历,即满足前序遍历(根->左->右)的顺序
     *
     * @param node
     * @param val
     * @return
     */
    private TreeNode findRecursive(TreeNode node, int val) {
        if (node == null) {
            return null;
        }

        if (node.val == val) {
            return node;
        }

        // 在左子树中查找
        TreeNode leftResult = findRecursive(node.left, val);
        if (leftResult != null) {
            return leftResult;
        }

        // 在右子树中查找
        return findRecursive(node.right, val);
    }
}
普通二叉树是最平衡的二叉树
如果套用平衡二叉树的概念的话,普通二叉树不关注数据域的比较,只保证树的结构,它可以说是最平衡的二叉树了。
# 二叉搜索树的实现
二叉树搜索树(BST)通过节点数据域之间的比较来决定新节点应该插入到左子树还是右子树。因此如果要使用二叉树来存储数据,数据域本身需要具备比较的特性,如整数比较大小,字符串比较字母序等。以下是二叉搜索树的实现:
package com.kieoo.interview;

// 二叉搜索树类
public class BinarySearchTree {
    private TreeNode root;
    /**
     * 1. 插入节点 - 递归版本
     * 时间复杂度: O(log n) 平均情况, O(n) 最坏情况(退化成链表)
     */
    public void insert(int val) {
        root = insertRecursive(root, val);
    }

    private TreeNode insertRecursive(TreeNode node, int val) {
        // 找到插入位置,创建新节点
        if (node == null) {
            return new TreeNode(val);
        }
        // 根据值大小决定插入方向
        if (val < node.val) {
            insertRecursive(node.left, val);
        } else if (val > node.val) {
            node.right = insertRecursive(node.right, val);
        }
        // 如果值相等,可以选择忽略、替换或特殊处理
        // 这里我们选择忽略重复值
        return node;
    }

    /**
     * 2. 查找节点 - 递归版本
     * 时间复杂度: O(log n) 平均情况, O(n) 最坏情况
     */
    public boolean search(int val) {
        return searchRecursive(root, val);
    }

    private boolean searchRecursive(TreeNode node, int val) {
        if (node == null) {
            return false;
        }

        if (val == node.val) {
            return true;
        } else if (val < node.val) {
            return searchRecursive(node.left, val);
        } else {
            return searchRecursive(node.right, val);
        }
    }
}
二叉搜索树不是平衡二叉树
二叉搜索树不是平衡二叉树,如果我们按数据域的大小和插入的先后顺序来构建如下的二叉树,显然构建出来的数会退化成链表结构:
数据:[1,2,3,4,5,6,7]
普通二叉树结果:
1
 \
  2
   \
    3
     \
      4
       \
        5
         \
          6
           \
            7
// 高度: 6,完全退化
# 红黑树
红黑树是一种“智能”的二叉排序树(平衡二叉树),它通过给节点涂上“红色”或“黑色”,并遵循一套简单的规则,来保证树不会长得太“歪”,从而保持高效的搜索速度。
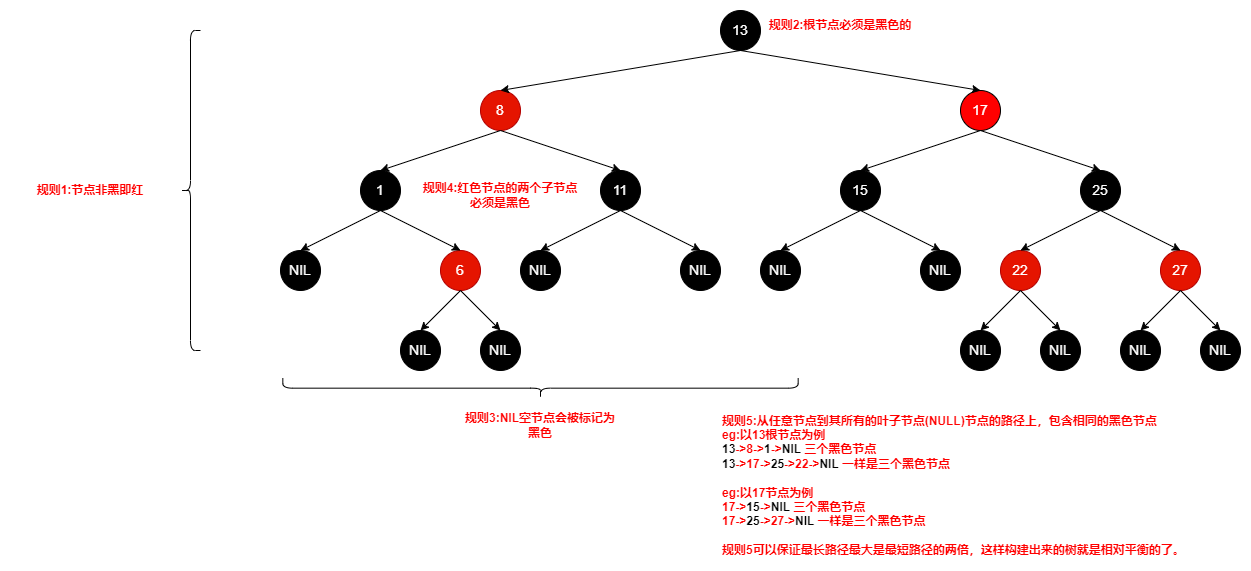
# 红黑树的五大约束规则
- 节点非红即黑。
- 根节点必须是黑色(这里根节点指的是树中唯一那个根节点)。
- 叶子节点(NIL空节点)是黑色。
- 红色节点的两个子节点必须是黑色。(即:不能有连续的红色节点)。
- 从任一节点到其所有叶子节点的路径上,包含相同数量的黑色节点。
# 红黑树的节点组成
红黑树的RBTreeNode节点的实现如下:
package com.kieoo.interview;

public class RBTreeNode {
    // 节点颜色是否是红色的标志
    public static final boolean RED = true;
    // 节点颜色是否是黑色的标志
    public static final boolean BLACK = false;
    // 数据域
    int key;
    // 节点颜色
    boolean color;
    // 当前节点的父节点,以及左右子节点,在红黑树调整的时候需要用到父节点,因此这里需要存储
    RBTreeNode left, right, parent;

    public RBTreeNode(int key) {
        this.key = key;
        this.color = RED; // 新节点默认为红色
        this.left = this.right = this.parent = null;
    }

    public boolean isRed() {
        return color == RED;
    }

    public boolean isBlack() {
        return color == BLACK;
    }
}
# 红黑树的插入流程
# 红黑树的调整流程

# 红黑树的调整-最简单场景
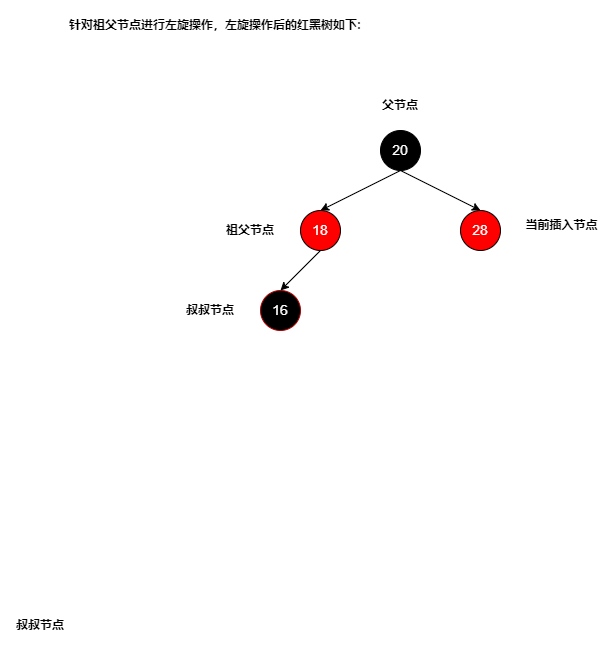
下面针对当前节点是父节点的右节点,父节点标记是红色,祖父节点和叔节点均为黑色的场景如何调整进行说明:
- 初始阶段,将当前节点插入父节点的右侧,可以看到此时父节点和插入的子节点都是红色,已经不满足红黑树的规则要求:

- 因为父节点和子节点都是红色,且都是右节点,叔叔节点是黑色,说明当前树有向右退化成链表的“趋势”,这时就需要干预了(左旋及调整节点颜色),这里先将祖父节点改为红色,再将父亲节点改为黑色:

- 在改色流程处理完后,针对祖父节点进行左旋调整(将父节点调整为新的祖父节点),修正节点向右增长的趋势以达到平衡:
# 为什么要左旋?
这个场景很明显树有向右退化成链表的趋势,因此需要左旋调整,以达到“平衡”。
# 为什么要修改父节点的颜色为黑色
因为这次旋转并不会改变树的链路长度,因此新的子根节点要保持黑色。
# 为什么要该给祖父节点G的颜色为红色
和上一个问题为什么修改父节点颜色一样,左旋并不会调整树的长度(也就是黑高不变),P作为新的子根已经是黑色了,原来的叔叔节点U也是黑色,黑高为2,此时如果原先的祖父节点G还是黑色的话,黑高就变成3了,因此需要将G标记为红色。
# 红黑树的实现
package com.kieoo.interview;
import java.util.Arrays;
import java.util.LinkedList;
import java.util.Queue;
// 红黑树类
public class RedBlackTree {
private RBTreeNode root;
private final RBTreeNode NIL; // 哨兵节点,表示空节点
public RedBlackTree() {
// 创建NIL节点并将root指定为NIL节点
NIL = new RBTreeNode(-1);
NIL.color = RBTreeNode.BLACK;
root = NIL;
}
// 左旋
private void leftRotate(RBTreeNode x) {
RBTreeNode y = x.right;
x.right = y.left;
if (y.left != NIL) {
y.left.parent = x;
}
y.parent = x.parent;
if (x.parent == null) {
root = y;
} else if (x == x.parent.left) {
x.parent.left = y;
} else {
x.parent.right = y;
}
y.left = x;
x.parent = y;
}
// 右旋
private void rightRotate(RBTreeNode y) {
RBTreeNode x = y.left;
y.left = x.right;
if (x.right != NIL) {
x.right.parent = y;
}
x.parent = y.parent;
if (y.parent == null) {
root = x;
} else if (y == y.parent.right) {
y.parent.right = x;
} else {
y.parent.left = x;
}
x.right = y;
y.parent = x;
}
// 插入节点
public void insert(int key) {
RBTreeNode newNode = new RBTreeNode(key);
newNode.left = NIL;
newNode.right = NIL;
// 记录当前遍历节点的父节点
RBTreeNode y = null;
// 记录当前遍历节点,插入都是从root开始遍历插入的
RBTreeNode x = root;
// 找到插入位置
while (x != NIL) {
y = x;
if (newNode.key < x.key) {
x = x.left;
} else {
x = x.right;
}
}
newNode.parent = y;
// 上面一步使用的while条件是x!=NIL,因此x实际对应的是一个NIL节点,因此需要拿NIL的父节点作为插入的标准节点
if (y == null) {
root = newNode;
} else if (newNode.key < y.key) {
y.left = newNode;
} else {
y.right = newNode;
}
// 如果新节点是根节点,直接染黑
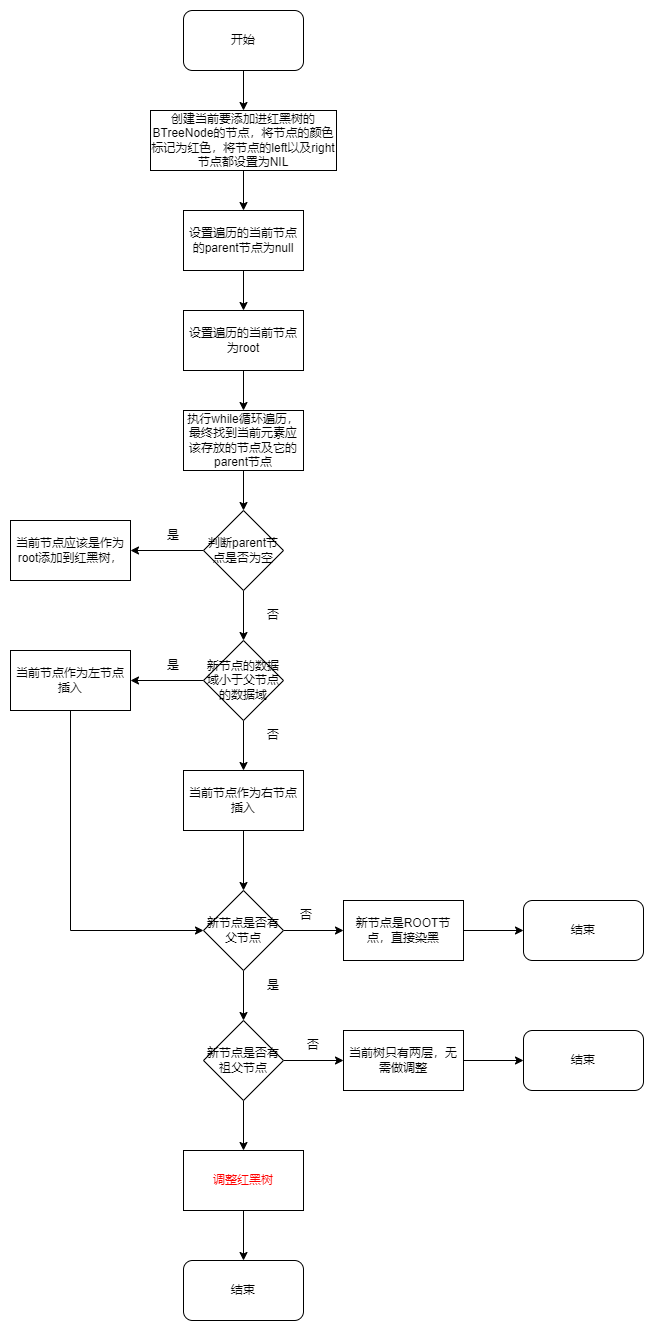
if (newNode.parent == null) {
newNode.color = RBTreeNode.BLACK;
return;
}
// 如果祖父节点为空,直接返回,这里直接当然是少执行了下面的fixInsert,因为没必要,这时树才两层,也就是一个根节点,两个叶子节点
if (newNode.parent.parent == null) {
return;
}
// 修复红黑树性质
fixInsert(newNode);
}
// 修复插入后的红黑树
private void fixInsert(RBTreeNode k) {
RBTreeNode u; // 叔叔节点
while (k.parent != null && k.parent.isRed()) {
if (k.parent == k.parent.parent.right) {
u = k.parent.parent.left; // 叔叔节点
if (u.isRed()) {
// Case 1: 叔叔节点是红色
u.color = RBTreeNode.BLACK;
k.parent.color = RBTreeNode.BLACK;
k.parent.parent.color = RBTreeNode.RED;
// todo:这里是递归的一个条件
k = k.parent.parent;
} else {
// Case 2: 叔叔节点是黑色,且k是左孩子
if (k == k.parent.left) {
k = k.parent;
rightRotate(k);
}
// Case 3: 叔叔节点是黑色,且k是右孩子
k.parent.color = RBTreeNode.BLACK;
k.parent.parent.color = RBTreeNode.RED;
leftRotate(k.parent.parent);
}
} else {
u = k.parent.parent.right; // 叔叔节点
if (u.isRed()) {
// Case 1: 叔叔节点是红色
u.color = RBTreeNode.BLACK;
k.parent.color = RBTreeNode.BLACK;
k.parent.parent.color = RBTreeNode.RED;
k = k.parent.parent;
} else {
// Case 2: 叔叔节点是黑色,且k是右孩子
if (k == k.parent.right) {
k = k.parent;
leftRotate(k);
}
// Case 3: 叔叔节点是黑色,且k是左孩子
k.parent.color = RBTreeNode.BLACK;
k.parent.parent.color = RBTreeNode.RED;
rightRotate(k.parent.parent);
}
}
if (k == root) {
break;
}
}
root.color = RBTreeNode.BLACK;
}
// 查找节点
public boolean search(int key) {
return searchRecursive(root, key) != NIL;
}
private RBTreeNode searchRecursive(RBTreeNode node, int key) {
if (node == NIL || key == node.key) {
return node;
}
if (key < node.key) {
return searchRecursive(node.left, key);
}
return searchRecursive(node.right, key);
}
// 中序遍历(用于验证树的结构)
public void inOrderTraversal() {
System.out.print("中序遍历: ");
inOrderRecursive(root);
System.out.println();
}
private void inOrderRecursive(RBTreeNode node) {
if (node != NIL) {
inOrderRecursive(node.left);
System.out.print(node.key + (node.isRed() ? "(红) " : "(黑) "));
inOrderRecursive(node.right);
}
}
// 层序遍历(用于验证树的结构)
public void levelOrderTraversal() {
System.out.print("层序遍历: ");
if (root == NIL) {
System.out.println("空树");
return;
}
Queue<RBTreeNode> queue = new LinkedList<>();
queue.add(root);
while (!queue.isEmpty()) {
RBTreeNode node = queue.poll();
System.out.print(node.key + (node.isRed() ? "(红) " : "(黑) "));
if (node.left != NIL) {
queue.add(node.left);
}
if (node.right != NIL) {
queue.add(node.right);
}
}
System.out.println();
}
// 获取树的高度
public int getHeight() {
return calculateHeight(root);
}
private int calculateHeight(RBTreeNode node) {
if (node == NIL) {
return 0;
}
int leftHeight = calculateHeight(node.left);
int rightHeight = calculateHeight(node.right);
return Math.max(leftHeight, rightHeight) + 1;
}
// 测试主函数
public static void main(String[] args) {
RedBlackTree tree = new RedBlackTree();
// 插入测试数据
int[] testData = {7, 3, 18, 10, 22, 8, 11, 26, 2, 6, 13};
System.out.println("插入顺序: " + Arrays.toString(testData));
for (int value : testData) {
tree.insert(value);
System.out.println("插入 " + value + " 后:");
tree.inOrderTraversal();
tree.levelOrderTraversal();
System.out.println("树高度: " + tree.getHeight());
System.out.println("--------------------");
}
// 搜索测试
System.out.println("搜索测试:");
System.out.println("搜索 10: " + tree.search(10));
System.out.println("搜索 99: " + tree.search(99));
System.out.println("搜索 13: " + tree.search(13));
// 最终树的状态
System.out.println("\n最终树状态:");
tree.inOrderTraversal();
tree.levelOrderTraversal();
System.out.println("树高度: " + tree.getHeight());
}
}
# B树
# B树的约束规则
- 节点的子节点数量规则(m阶B树)
- 根节点:其子节点数量在 [2, m] 之间(除非整棵树只有一个根节点)。
- 非根的内部节点:其子节点数量在 [⌈m/2⌉, m] 之间。
为什么? 这个规则确保了每个节点(除了根节点)至少有半满的状态,从而提高了空间利用率和查询效率,避免了树退化成链表。
- 节点的关键字数量规则
关键字数量和子节点数量是紧密相关的。对于一个有 k 个关键字的节点,它恰好有 k+1 个子节点(如果它不是叶子节点的话)。
- 根节点:其关键字数量在 [1, m-1] 之间。
- 非根节点(包括内部节点和叶子节点):其关键字数量在 [⌈m/2⌉ - 1, m-1] 之间。
简单来说:一个节点的关键字数比它的子节点数少1。
关键字的有序性
每个节点中的关键字都是升序排列的。这是进行高效二分查找的基础。子树的关键字范围分割规则(核心搜索属性)
这是B树最重要的搜索属性。假设一个节点包含关键字:K1, K2, K3, ..., Kk(按升序排列),那么它有 k+1 个子树(P1, P2, P3, ..., Pk+1)。
对于任意关键字 Ki:
所有在 Pi 子树中的关键字都小于 Ki。
所有在 Pi+1 子树中的关键字都大于 Ki。
这个规则保证了从根节点开始,可以根据关键字的大小关系,准确地导航到左子树或右子树,就像二叉搜索树一样,但每个节点的分支更多。叶子节点层平衡规则
所有的叶子节点都位于同一层。这是B树能够保持平衡的关键约束。
为什么? 这保证了从根节点到任何一个叶子节点的路径长度都是相等的,因此查询任何一条记录所需要的磁盘I/O次数是基本稳定的,提供了可预测的性能。
# 规则总结与示例
以3阶B树为例,即2-3树进行说明:
对于一棵 3阶B树 (m=3):
t = ⌈3/2⌉ = 2
根节点的子节点数:[2, 3]
非根节点的子节点数:[2, 3]
根节点的关键字数:[1, 2]
非根节点的关键字数:[1, 2] (因为 ⌈m/2⌉ - 1 = 1)

        [23, 45]        <-- 根节点,有2个关键字
       /    |    \
[10, 20] [30, 40] [50]  <-- 所有叶子节点在同一层

让我们用规则来验证:
1. 根节点有2个关键字(23, 45),在 [1, 2] 范围内。它有3个子节点,在 [2, 3] 范围内。
2. 非根节点 [10,20] 有2个关键字,[30,40] 有2个关键字,[50] 有1个关键字。它们的关键字数都在 [1, 2] 范围内。
3. 所有关键字都是有序的。
4.以根节点为例:
左子树 [10,20] 的所有关键字都小于 23。
中间子树 [30,40] 的所有关键字都在 (23, 45) 之间。
右子树 [50] 的所有关键字都大于 45。

5. 所有叶子节点都在同一层。
# 什么是B树的阶
B树的阶指的是一个节点所能拥有的最大子节点数量。如3阶B树中,一个节点能拥有的最大子节点数量是3个。
# 什么是节点的关键字数量
B树的节点关键字数量指的是节点里存储的数据的数量,如3阶B树最多只有3-1=2个关键字。
# B树的阶是动态调整的吗?
不是的,B树的阶是固定的,不会随插入删除而调整。
# 个人对B树的理解
- 每个节点里的元素数量有一个固定值,不能超过这个固定值。
- 每个非叶节点的子节点数量固定,不能超过固定值。
- 叶子节点中的数据满足排序,所有叶子节点串联起来,内部数据同样满足排序。
- 随着叶子节点的增多,非叶节点也会动态调整,非叶节点的数量变多,树的层级也会跟着变高。
底层叶子节点满足从小到大的分布方式,且阶固定的树结构。需要注意阶和树的高度是完全不同的两个概念,正是因为B树的阶保持不变,所以B树的高度才会自顶向上生长(变高)。
下面两个都是3阶B树,显然一个数据量多,一个数据量少,一个树“高”,一个树“低”,同样的,这两个树叶都满足相同的规律,如每个节点的子节点不超过3个,每个节点的关键字不超过2个。

        [23, 45]        <-- 根节点,有2个关键字
       /    |    \
[10, 20] [30, 40] [50]  <-- 所有叶子节点在同一层


                               [45]
                             /      \
                    [25]                 [65]
                   /    \               /    \
          [15]        [35]        [55]        [75]
         /   \       /   \       /   \       /   \
    [5,10] [20] [30] [40] [50] [60] [70] [80,85]
    /  |  \  |   |    |    |    |    |    |   |   \
[1,2][3,4][6,7][11,12][16,17][21,22][26,27][31,32][36,37][41,42][46,47][51,52][56,57][61,62][66,67][71,72][76,77][81,82][86,87]
B树的新增,插入,删除流程
# B树的代码实现
- 节点类
package com.kieoo.interview;
import java.util.ArrayList;
import java.util.List;
public class BTreeNode {
List<Integer> keys; // 关键字列表
List<BTreeNode> children; // 子节点列表
boolean leaf; // 是否为叶子节点,叶子节点没有子节点
int t; // 最小度数,度数的概念和树的阶的概念类似,都是确定一个节点中有几个元素以及一个节点有几个子节点的
public BTreeNode(int t, boolean leaf) {
this.t = t;
this.leaf = leaf;
this.keys = new ArrayList<>();
this.children = new ArrayList<>();
}
// 遍历节点
public void traverse() {
int i;
for (i = 0; i < keys.size(); i++) {
if (!leaf) {
children.get(i).traverse();
}
System.out.print(keys.get(i) + " ");
}
if (!leaf) {
children.get(i).traverse();
}
}
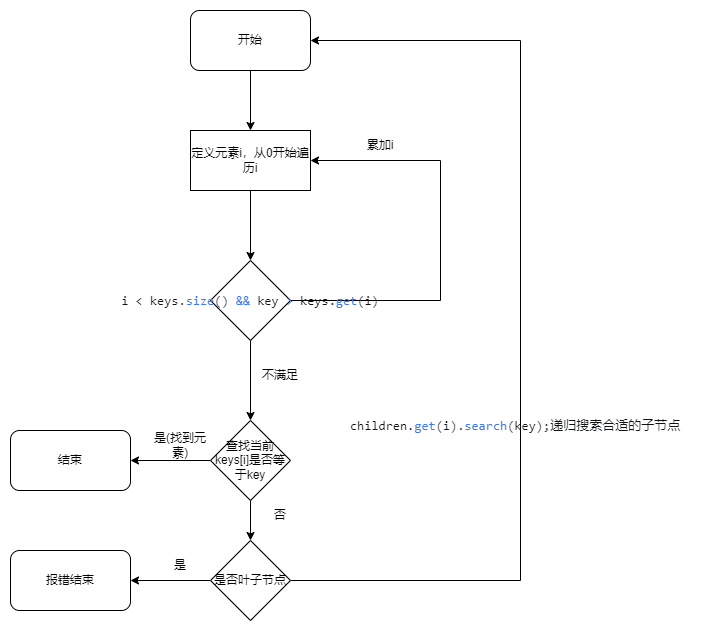
// 查找关键字
public BTreeNode search(int key) {
int i = 0;
while (i < keys.size() && key > keys.get(i)) {
i++;
}
if (i < keys.size() && keys.get(i) == key) {
return this;
}
if (leaf) {
return null;
}
return children.get(i).search(key);
}
}
- B树实现类
package com.kieoo.interview;
public class BTree {
private BTreeNode root;
private int t; // 最小度数
public BTree(int t) {
this.t = t;
root = new BTreeNode(t, true);
}
// 遍历B树
public void traverse() {
if (root != null) {
root.traverse();
}
}
// 查找关键字
public BTreeNode search(int key) {
return root == null ? null : root.search(key);
}
/**
* 插入关键字
* 补充说明:B树中插入有两种实现方式
* 1. 这个代码中的逻辑,从根节点开始插入,预防性的进行分叉
* 2. 首先将key插入特定的叶子节点,然后递归当前节点到根节点的每一个链路是否不满足要求,不满足要求则分叉处理
*
*/
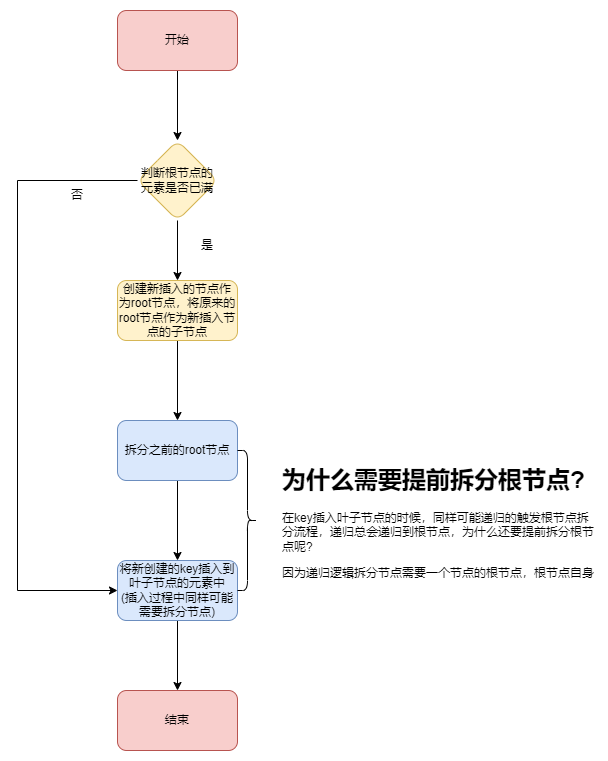
public void insert(int key) {
if (root.keys.size() == 2 * t - 1) {
BTreeNode newRoot = new BTreeNode(t, false);
newRoot.children.add(root);
splitChild(newRoot, 0);
root = newRoot;
}
insertNonFull(root, key);
}
// 向非满节点插入关键字
private void insertNonFull(BTreeNode node, int key) {
int i = node.keys.size() - 1;
if (node.leaf) {
while (i >= 0 && key < node.keys.get(i)) {
i--;
}
node.keys.add(i + 1, key);
} else {
while (i >= 0 && key < node.keys.get(i)) {
i--;
}
i++;
if (node.children.get(i).keys.size() == 2 * t - 1) {
splitChild(node, i);
if (key > node.keys.get(i)) {
i++;
}
}
insertNonFull(node.children.get(i), key);
}
}
// 分裂子节点
private void splitChild(BTreeNode parent, int i) {
BTreeNode fullChild = parent.children.get(i);
BTreeNode newChild = new BTreeNode(t, fullChild.leaf);
// 移动后半部分关键字到新节点
for (int j = 0; j < t - 1; j++) {
newChild.keys.add(fullChild.keys.remove(t));
}
// 如果不是叶子节点,移动后半部分子节点到新节点
if (!fullChild.leaf) {
for (int j = 0; j < t; j++) {
newChild.children.add(fullChild.children.remove(t));
}
}
// 将中间关键字提升到父节点
parent.keys.add(i, fullChild.keys.remove(t - 1));
parent.children.add(i + 1, newChild);
}
// 测试示例
public static void main(String[] args) {
BTree bTree = new BTree(3); // 创建最小度数为3的B树
int[] keys = {10, 20, 5, 6, 12, 30, 7, 17};
for (int key : keys) {
bTree.insert(key);
}
System.out.println("B树遍历结果:");
bTree.traverse();
System.out.println();
int searchKey = 6;
BTreeNode result = bTree.search(searchKey);
if (result != null) {
System.out.println("关键字 " + searchKey + " 找到在节点中");
} else {
System.out.println("关键字 " + searchKey + " 未找到");
}
}
}
# B树的插入流程
# B树的搜索流程
# B+树
# B+树的特点
- 所有数据存储在叶子节点
- 内部节点只存储键值(索引)和子节点指针
- 叶子节点存储所有的键值和对应的数据(或数据指针)
- 叶子节点之间通过指针连接形成有序链表
- 完美的平衡性
- 所有叶子节点都位于同一层
- 从根节点到任意叶子节点的路径长度完全相同
- 保证查询性能的稳定性
- 高效的顺序访问
- 叶子节点通过双向链表连接
- 支持高效的范围查询和全表扫描
- 不需要回到根节点即可遍历所有数据
- 多路分支,降低树高
- 每个节点可以包含大量子节点(通常几百个)
- 大大降低了树的高度
# B+树和B树的区别?
| 特性 | B+树 | B树 |
|---|---|---|
| 数据存储 | 只在叶子节点 | 所有节点都可存储数据 |
| 叶子节点 | 形成有序链表 | 相互独立 |
| 内部节点 | 只存键和指针 | 存键、指针和数据 |
| 范围查询 | 非常高效 | 效率较低 |
| 树高 | 相对较矮 | 相对较高 |
| 扫描性能 | 顺序扫描极佳 | 需要遍历整棵树 |
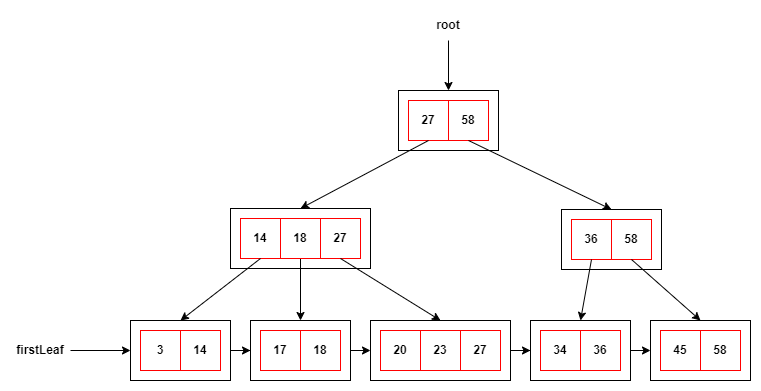
# B+树的示意图
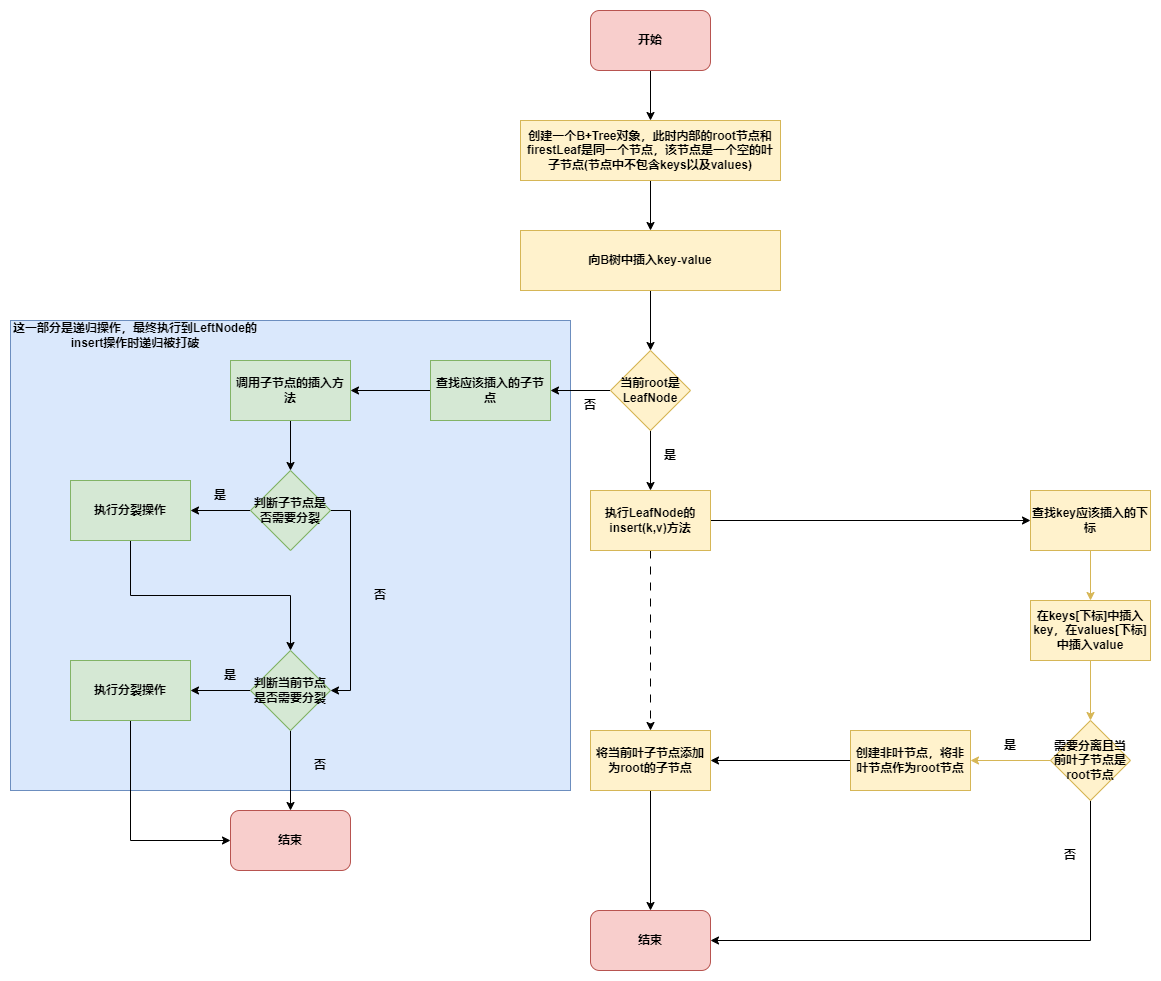
# B+树的插入流程
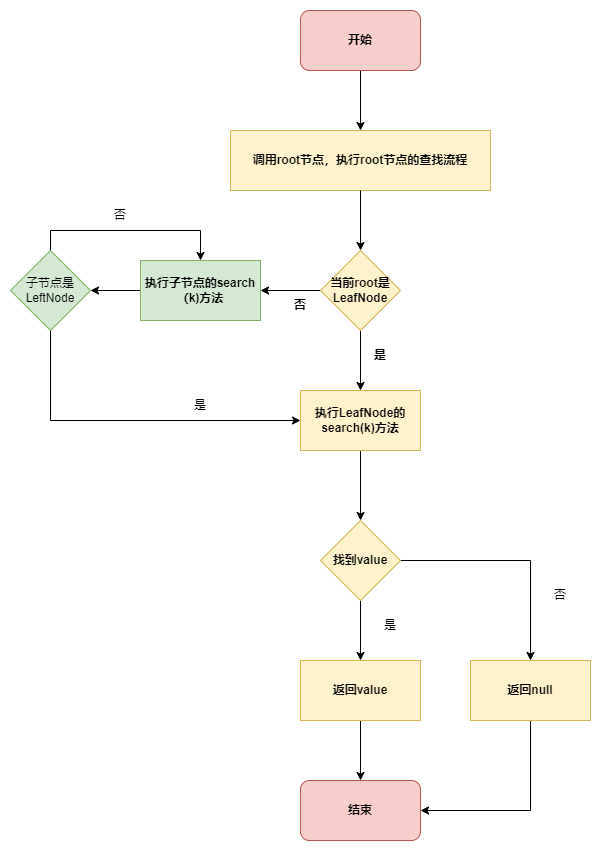
# B+树的查找流程
# B+树的代码实现
package com.kieoo.interview.btree;

import java.util.ArrayList;
import java.util.List;

/**
 * 简化的B+树实现(仅用于演示核心概念)
 * 假设键为整数,值为字符串
 */
public class SimpleBPlusTree {
    private static final int DEFAULT_ORDER = 4; // 默认阶数
    private final int order; // B+树的阶
    // 与B+树的图对应,这里是一个根节点
    private Node root;
    // 与B+树的图对应,这里是一个叶子节点
    private LeafNode firstLeaf; // 第一个叶子节点,用于顺序遍历

    public SimpleBPlusTree() {
        this(DEFAULT_ORDER);
    }

    public SimpleBPlusTree(int order) {
        this.order = order;
        this.root = new LeafNode();
        this.firstLeaf = (LeafNode) root;
    }

    /**
     * B+树节点抽象类,具体实现类是非叶子节点和叶子节点
     */
    abstract class Node {
        // 无论是根节点还是叶子节点,内部都包含keys的数据域
        protected List<Integer> keys;

        public Node() {
            this.keys = new ArrayList<>();
        }

        public int getKeyCount() {
            return keys.size();
        }

        public boolean isOverflow() {
            return keys.size() > order - 1;
        }

        public boolean isUnderflow() {
            return keys.size() < (order - 1) / 2;
        }

        // 在节点中查找键应该插入的位置
        protected int findKeyIndex(int key) {
            int left = 0, right = keys.size() - 1;
            while (left <= right) {
                int mid = left + (right - left) / 2;
                if (keys.get(mid) == key) {
                    return mid;
                } else if (keys.get(mid) < key) {
                    left = mid + 1;
                } else {
                    right = mid - 1;
                }
            }
            return left;
        }

        public abstract String search(int key);
        public abstract void insert(int key, String value);
        public abstract Node split();
    }

    /**
     * 内部节点(非叶子节点)
     */
    class InternalNode extends Node {
        // 非叶子节点存储了多个子节点
        private List<Node> children;

        public InternalNode() {
            super();
            this.children = new ArrayList<>();
        }

        @Override
        public String search(int key) {
            int index = findKeyIndex(key);
            // 找到合适的子节点继续搜索
            return children.get(index).search(key);
        }

        @Override
        public void insert(int key, String value) {
            int index = findKeyIndex(key);
            Node child = children.get(index);
            child.insert(key, value);

            // 检查子节点是否需要分裂
            if (child.isOverflow()) {
                Node newChild = child.split();
                insertChild(index, newChild);
            }

            // 检查当前节点是否需要分裂
            if (isOverflow()) {
                if (root == this) {
                    // 根节点分裂,树高增加
                    InternalNode newRoot = new InternalNode();
                    newRoot.keys.add(this.keys.get(order / 2));
                    newRoot.children.add(this);
                    newRoot.children.add(split());
                    root = newRoot;
                }
            }
        }

        // 插入子节点
        private void insertChild(int index, Node newChild) {
            Node rightChild = children.get(index);
            int promotedKey = getPromotedKey(rightChild, newChild);

            // 插入新的键和子节点
            keys.add(index, promotedKey);
            children.add(index + 1, newChild);
        }

        // 获取提升到父节点的键
        private int getPromotedKey(Node left, Node right) {
            if (left instanceof LeafNode) {
                return right.keys.get(0);
            } else {
                return left.keys.get(left.keys.size() - 1);
            }
        }

        @Override
        public Node split() {
            int splitIndex = keys.size() / 2;
            InternalNode newNode = new InternalNode();

            // 移动一半的键和子节点到新节点
            newNode.keys.addAll(keys.subList(splitIndex + 1, keys.size()));
            newNode.children.addAll(children.subList(splitIndex + 1, children.size()));

            // 从原节点移除移动的元素
            keys.subList(splitIndex, keys.size()).clear();
            children.subList(splitIndex + 1, children.size()).clear();

            return newNode;
        }
    }

    /**
     * 叶子节点
     */
    class LeafNode extends Node {
        // 叶子节点存储了下一个节点和具体的值
        // vaules和key是对应关系,比如key的下标是2,values里下标同样是2
        private List<String> values;
        private LeafNode next; // 指向下一个叶子节点

        public LeafNode() {
            super();
            this.values = new ArrayList<>();
            this.next = null;
        }

        @Override
        public String search(int key) {
            int index = findKeyIndex(key);
            if (index < keys.size() && keys.get(index) == key) {
                return values.get(index);
            }
            return null; // 未找到
        }

        @Override
        public void insert(int key, String value) {
            int index = findKeyIndex(key);

            // 插入键值对
            keys.add(index, key);
            values.add(index, value);

            // 检查是否需要分裂
            if (isOverflow()) {
                if (root == this) {
                    // 根节点分裂
                    InternalNode newRoot = new InternalNode();
                    LeafNode newLeaf = (LeafNode) split();
                    newRoot.keys.add(newLeaf.keys.get(0));
                    newRoot.children.add(this);
                    newRoot.children.add(newLeaf);
                    root = newRoot;
                }
            }
        }

        @Override
        public Node split() {
            int splitIndex = keys.size() / 2;
            LeafNode newLeaf = new LeafNode();

            // 移动一半的键值对到新节点
            newLeaf.keys.addAll(keys.subList(splitIndex, keys.size()));
            newLeaf.values.addAll(values.subList(splitIndex, values.size()));

            // 从原节点移除移动的元素
            keys.subList(splitIndex, keys.size()).clear();
            values.subList(splitIndex, values.size()).clear();

            // 更新叶子节点链表
            newLeaf.next = this.next;
            this.next = newLeaf;

            return newLeaf;
        }

        // 范围查询(简化版)
        public List<String> rangeSearch(int startKey, int endKey) {
            List<String> result = new ArrayList<>();
            LeafNode current = this;

            while (current != null) {
                for (int i = 0; i < current.keys.size(); i++) {
                    int key = current.keys.get(i);
                    if (key >= startKey && key <= endKey) {
                        result.add(current.values.get(i));
                    } else if (key > endKey) {
                        return result; // 已超出范围,提前结束
                    }
                }
                current = current.next;
            }
            return result;
        }
    }

    /**
     * 公共API方法
     */

    // 插入操作
    public void insert(int key, String value) {
        root.insert(key, value);
    }

    // 查询操作
    public String search(int key) {
        return root.search(key);
    }

    // 范围查询
    public List<String> rangeSearch(int startKey, int endKey) {
        // 找到包含startKey的叶子节点
        LeafNode leaf = findLeafNode(startKey);
        return leaf.rangeSearch(startKey, endKey);
    }

    // 找到包含指定键的叶子节点
    private LeafNode findLeafNode(int key) {
        Node node = root;
        while (node instanceof InternalNode) {
            InternalNode internal = (InternalNode) node;
            int index = internal.findKeyIndex(key);
            node = internal.children.get(index);
        }
        return (LeafNode) node;
    }

    // 打印树结构(用于调试)
    public void printTree() {
        printNode(root, 0);
    }

    private void printNode(Node node, int level) {
        StringBuilder indent = new StringBuilder();
        for (int i = 0; i < level; i++) {
            indent.append("  ");
        }

        if (node instanceof LeafNode) {
            LeafNode leaf = (LeafNode) node;
            System.out.println(indent + "Leaf: " + leaf.keys);
        } else {
            InternalNode internal = (InternalNode) node;
            System.out.println(indent + "Internal: " + internal.keys);
            for (Node child : internal.children) {
                printNode(child, level + 1);
            }
        }
    }

    /**
     * 测试示例
     */
    public static void main(String[] args) {
        SimpleBPlusTree tree = new SimpleBPlusTree(4);

        // 插入测试数据
        tree.insert(10, "Value10");
        tree.insert(20, "Value20");
        tree.insert(5, "Value5");
        tree.insert(15, "Value15");
        tree.insert(25, "Value25");
        tree.insert(30, "Value30");
        tree.insert(35, "Value35");
        tree.insert(40, "Value40");

        // 打印树结构
        System.out.println("B+树结构:");
        tree.printTree();

        // 查询测试
        System.out.println("\n查询测试:");
        System.out.println("key=15: " + tree.search(15));
        System.out.println("key=100: " + tree.search(100));

        // 范围查询测试
        System.out.println("\n范围查询 [15, 35]:");
        List<String> rangeResult = tree.rangeSearch(15, 35);
        for (String value : rangeResult) {
            System.out.println(value);
        }
    }
}
# Mysql中B+树的阶是固定的吗?
是的,B+树的阶由Mysql的页大小(16K)以及索引的字段的长度决定,如对一个int(20)类型的主键做索引(实际大小4字节),算出来的阶数是1600,在这个数据量的情况下,10万条数据树的高度约2-3层,1亿条数据树的高度约等为3到4层。